Wednesday, February 23, 2011

Green Surround Over-seeding

One of our most recent projects has been to focus on some of our more problematic green surrounds. There are a few surrounds that we have had issues with some thinning of turf, which is becoming an issue with playability around the greens. Healthy thick grass is what we strive for around the greens, which is optimum for playability. Our strategy to solve this problem is to over-seed the surrounds that have a lot of thinning turf, which is a result of a number of factors. Most of the thinning is a result of animal damage, high traffic, irrigation inefficiencies, and environmental factors such as shade, and lack of air circulation. Along with over-seeding these area's, we are also implementing several irrigation changes along with some pruning over the next couple weeks.  

Now the over-seeding process itself includes several agronomic practices which help establish the seed, and give it the best possibly growing conditions. Below is a series of photos that cover all the practices involved along with an explanation of there importance.  


This photo was taken on the right side of #4 green. This is by far one of the worst surrounds and is a good example of why we are over-seeding.  There is a big oak tree that is the cause for some of this thinning, but it has also been heavily damaged by gopher activity. In this photo you can see several flags, these are to mark the sprinkler heads and irrigation boxes. This is the first step of the over-seeding process as they ensure easy visibility for operators. 
This photo is just another example of the thinning behind 4 green. 
The second step of the over-seeding process is to mow the surround to a height of 1 inch, this is done for a couple of reasons. First it makes it easier for the seed to make its way to the soil, to help the efficiency of the germination process.  Secondly the mowing of the existing grass stimulates tillering( lateral growth)  of the grass plant, which is results in a much denser stand of turf. 
This photo shows how much debris are left after mowing the surround to inch. 
An up close photo of the difference in height of cut, you can see how there is more surface area for the seed after mowing. 
After the surround has been mowed down to 1 inch, it is then aerified using solid tones with close spacing. This helps to relieve soil compaction and increase air flow within the root zone. Ultimately this results in a healthy grass plant. 
After its aerified we then go over the surround with a verticutting unit which is attached to a John Deere tractor. This helps to remove any dead/built up material from the soil profile, as well as creating grooves to help the seed contact the soil. Which will help with germination and keeping the seed wet until germination. 
Now it time to clean up the mess we just made. This is done with a combination of leaf rakes, back pack blower, and a buffalo blower. Most of the debris are placed in to piles which are then loaded into a pro-gator, anything left over is cleaned up with the buffalo blower.  
All the material closer to the green are pushed out about 6 feet from the green,  which gives the buffalo blower room to operate. It also reduces traffic close to the green complex. 

This is a close up to show an area after it has been aerified and verticut. 

This is what it looks like after it has been seeded, which is then followed by a starter fertilizer and watered in.  The final process is top-dress the surround which helps with water retention, a key component for germination. 


Monday, February 7, 2011

NCGA Area of Emphasis- Course Projects: Fescue Slope Renovation

One of the bigger projects that we are working on right now is the renovation of the fescue slopes around bunkers. The goal is to replace the fescue around bunker slopes in key areas as needed. The areas that need fescue are predominately south facing slopes, where the fescue seems to struggle. But there are also some that have excessive animal damage. 

 Now this is a fairly involved process, which is why we are targeting the worst bunkers. The objective of this renovation is to restore the bunkers back to the original design, and in some cases change the grass type which can handle the environmental conditions better in certain areas. A good example would be the green side bunker on #12, it was originally all fescue. With it being a south facing slope, the stress from being in the direct sunlight was causing the fescue to struggle. So we took sod from out of the nursery fairway/tee blend, and used it in place of the fescue. The blend consists of ( 30% Creeping Red Fescue, 25% Chewings Fescue, 20% Kentucky Bluegrass, 15% Colonial bentgrass, and 10% Perennial Ryegrass). I've included photos below to show what we did along with an explanation of each process.  


This is the Green side bunker on # 12. As you can see there is a considerable amount of thinning and dead spots, which is why we resodded it. The first process is to prepare the bunker for sod. To make the process go as fast as possible, we use a Jr. Sod cutter in any area possible. First we make a pass around the outline of the area we are going to treat, which in this case is the entire bunker. 

After we have used the sod cutter in the flat areas, we use flat shovels and a reciprocating trimmer to remove the rest of the grass. We then go back with some soil to add to any damaged areas, to smooth out the grade before sodding. That concludes the prep work for the bunker


When we start laying the sod down it is important to start from the edge of the bunker and work up the face of the slope. The sod is laid in a staggered pattern so the seams don't line up, staggering the seams helps the turf to get established quicker. Also ensuring the adjacent rows are laid in a tight manner helps minimize air flow in between the rows of the installed turf , preventing the edges from dry out.


This photo shows the sod being laid around the perimeter of the bunkers edge first.

All the sod on steep slopes such as the one in this photo have been stapled down, this ensures it will not shift while we wait to establish the turf.


Pieces are cut in place to fill any gaps that occur during the process.


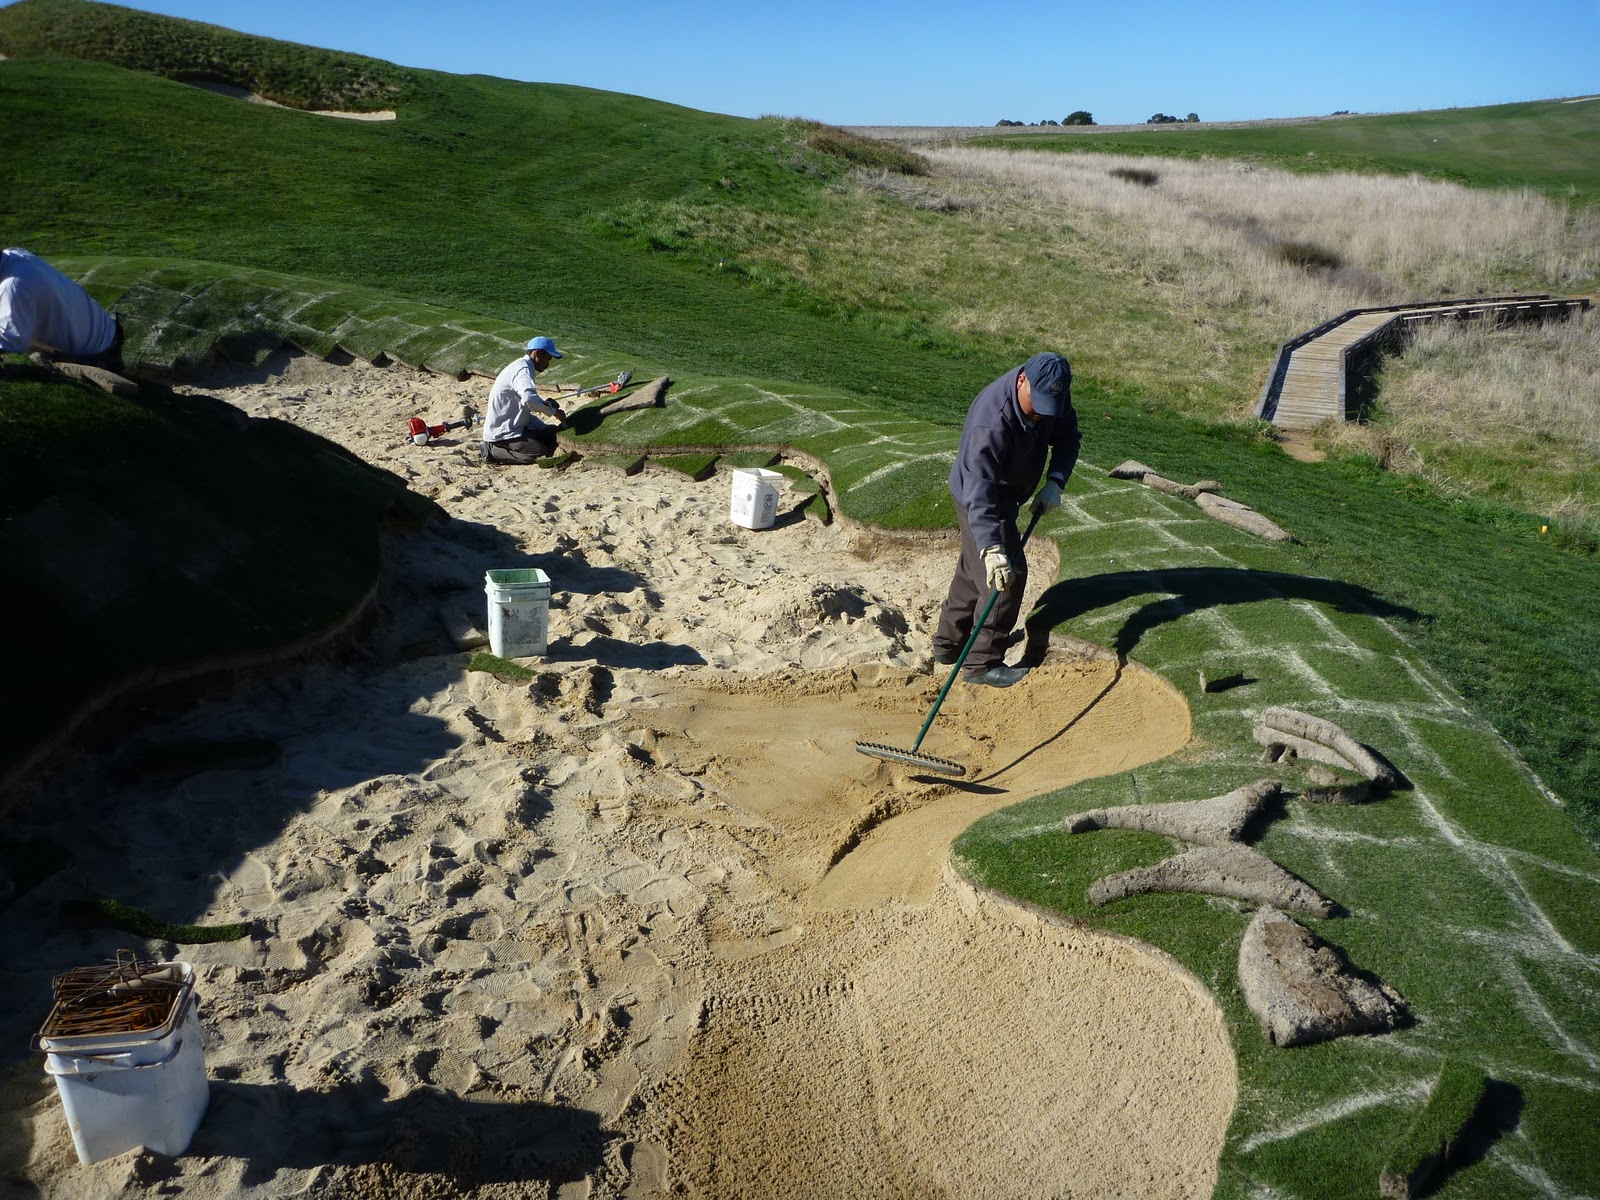
After all the sod has been laid down and cut, the seams filled with sand to prevent the edges from drying out.
After all the seams have been filled with sand, the final edge is ready to be cut. This is done with a reciprocating trimmer.


This is what the edge looks like after its been cut.

After the edge is cut sand can be pushed back into place.
The bunker is then cleaned of any debris to avoid contaminating the sand, and is full raked.

We also used a starter fertilizer (6-20-20) as well as a granular wetting agent to help the sod establish.


The final step is to hand water in the fertilizer and to keep the sod from drying out.


The bunker is roped off and marked ground under repair.

Saturday, January 15, 2011

Box Brush and Thistle Removal

One of the current projects we have been working on is the removal of thistle and brush from the native areas. The removal of these weeds is important for a number of reasons, playability from landing areas if you miss the fairway, it also helps bring the aesthetics of the golf course back to the original design, and most importantly it stops the obnoxious weeds from taking over the native areas which border the course.

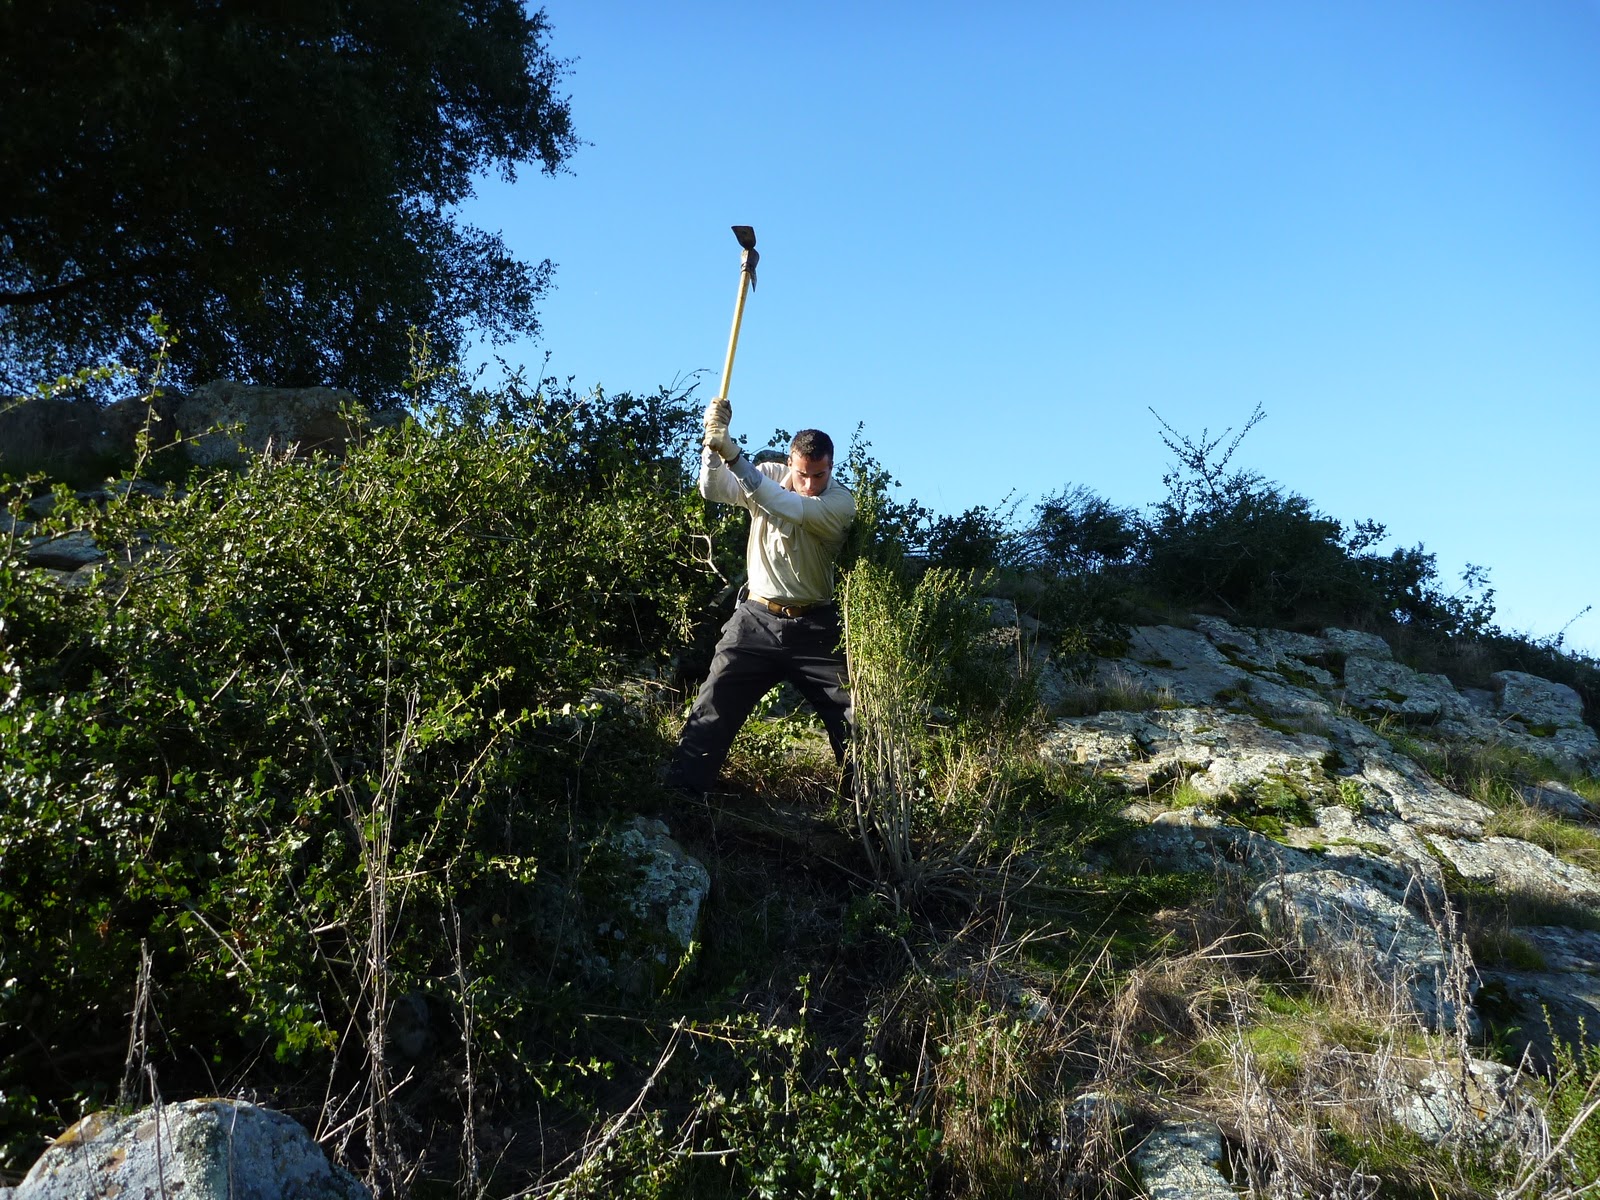
The process for removing the weeds is pretty simple. Some of them can be pulled by hand because of how soft the ground is currently, but others are removed using a shovel or a pick axe. After removed they are then loaded into the back of a pro-gator and brought back to maintenance facility, where the debris are put into a pile.


Days where we have frost allow us to work projects such as the Native Weed Removal.


This is a photo shows of the guys cleaning the area around the courtesy path between 12 green and 13 tee.

This is the area around the courtesy path before we started. 
This is what it looked like after we finished the removal process.


This photo shows our newest addition to the agronomy team, Ryan Borris, using a pick axe to remove box brush.


This is a view from the Pro tee on #13 after we got done.
This photo shows how many oak tree suckers and box brush there was in front of  #13 tee on the right side.
This is what it looked like after we got it cleaned up.

Tuesday, December 14, 2010

Poa Managment/Ballmark Removal

Maintaining bentgrass greens can have unique challenges, which has required us to adapt in order to provide the best playing surface possible. Two of these challanges are the encroachment of Poa sp. on the greens,which  is actually a weed, and ballmarks that don't heal with the cooler weather. So we sent a team of 4 guys to go around with 3/4" inch probes to remove ballmarks and Poa from the greens, and then they repaired the areas using icepicks.  


In the center of this photo is Poa annua encroaching on the green, which we plugged out. 
Here is an example of a ballmark that was plugged out.

This is what it looks like after the area has been plugged.

This is the final result after the area has been mended with an Icepick.
Here is a good example showing the process. Two guys would be resposible for plugging the areas out, while two more guys followed behind them repairing the areas.


Guys at work.

Monday, December 6, 2010

NCGA Area of Emphasis-Daily Maintenance Operations: Greens Mowing.

Providing the best play surface possible is our goal at TPC Stonebrae. Some of the keys to maintaining a quality and healthy putting surface is the quality of cut, and  frequency. Which is why we prefer to walk mow greens 6 days a week, and only triplex one day when we are short staff. One thing we do here which I've never experienced before is using brushes on the walkmowers, which we will usually use 3-4 days a week. The benefit of the brushes is to stand up the bentgrass to increase the quality of cut and to promote upright growth, which helps with other cultural practices such as topdressing.


This is a font look at the brush system that our mechanic John Cunnigham has created.


This is an overhead look at the brushes on the basket.

Here is a side view of the brush attachment, which can easily be removed.

This is how much grass we got making about 10 passes in a couple directions.
This is a video to give you an example of how the brush attachment works.

Saturday, November 20, 2010

NCGA Area of Emphasis- Daily Maintenance Operations: Fairway Divots

One of the many weekly tasks performed at TPC Stonebrae is the filling of fairway divots. Now this may seem like a minuscule task, but it is actual a very important one. There are several reasons why do this, from a maintenance standpoint it helps the fairways recover faster and also ensures a good playing surface. We usually fill divots twice a week in the afternoon.


This photo is an example of a fairway divot taken on the fifth fairway, in a area that receives a lot of play.

The first step for the guys doing fairway divot mix is to prepare the mix itself. This is done in the back of the cart and the mix ratio's are 8 shovels of a soil mix to 2 shovels of Perennial Rye grass seed.  The soil mix we use has provided great results with helping the grass seed germinate, the mix contains sand (20%), soil(70%), and peat moss(10%). After the cart is filled the guys are ready to start, they will also bring 5 gallon buckets with them so they can walk the fairways and fill every divot. Having a cart full of a prepaired mix makes it easy to fill the buckets back up when they run out.


This photo shows one of the guys dropping sand into a divot, the key here is to put just enough mix in the divot so that its barely below the level of the existing turf. This is important because the fairway mower will scalp anything that is too high, making it hard to establish any grass in that divot. Also you don't want it to be to low as it will leave a depression and uneven playing surface.

This photo illustrates the second step which is to smooth the divot, in this case with his foot. Which is usually a pretty fast and effective way to level out a fairway divot.
This photo shows the divot after it was filled and leveled.
Since the guys walk the entire length of the fairway they will usually bring two carts, park one at the beginning of the fairway and then they will take the second cart with the mix and start at the end of the fairway. This way when they finish filling the divots  they can  drive the cart they dropped off back to the cart with the mix, which is more efficient.

Friday, November 5, 2010

Fall Fairway Aerification

Our Fall Fairway Aerification immediately follows the greens and tee aerification. It usually takes between 5-6 weeks to get everything aerified and top dressed. There are several reasons why this process is important culturally including increased air flow to the roots, compaction relief, and removal of built up organic debris also known as 'thatch'. Because our fairways are predominantly bentgrass which is a high thatch producing grass, we verticut the fairways before the aerifier punched them. Verticutting is a way to thin out the turf as well as remove thatch, using vertical blades that are set the desired depth.

 Fairway Aerification includes the following steps ( flag the heads, verticutting the fairway, aerifing, cleaning up the plugs with a sweeper and Pro-Gators, blowing/dragging the fairway, gypsum application, sand topdressing, and the last step is to drag the sand in the open holes.) Most of the process are shown in photo's below.

After the hole has been flagged it is verticut before the aerifier gets there.


After the hole has been verticut the aefier then proceeds, this photo shows the operator going in a different direction on a mound in order to get a deeper plug.
After the hole has been aerified it is cleaned. This photo shows the tc-125 sweeper being pulled by a pro-gator. When the sweeper is full it is emptied in the back of a pro-gator, and the plugs are dumped in certain areas.
While the sweeper is picking up plugs there are a couple people using snow shovels to push cores out of low areas, which are either hand shoveled or picked up later with the sweeper.


Right behind the Sweeper is the blower which also has a drag mat attached, this picks up any smashed cores and debris and moves them to the pile for the sweeper to pick up.

This is one of the areas that the cores were dumped, this is a trail from 6 tee.
After the gypsum and sand are put down, the fairway is gone over with a drag mat. The objective is to fill the holes and spread the sand out evenly.
This is an example of an area that has been dragged already to one that has not.